In my last blog posting I highlighted the fact that I hadn't been out and about much over the Winter months. Now that it is Spring I have been out even less (Thank You Covid-19). I was hoping to bring you some stunning wildlife photographs and videos, but I am afraid not.
I have however been keeping myself busy during this "lock-down" by doing a bit of woodwork. I hadn't done proper woodwork (other than a few bits of basic DIY) since I was at high school........ which was many moons ago.
About 18 months back I started attending woodwork classes on a Tuesday evening at the local high school and have really enjoyed it. I have made many different things, but mostly I have made tables of some sort, so I thought I would share my table making experiences with you:
1. Oak Table/Bench
My first table was really made as a bench, but we use it as a table in our conservatory:
 |
| Bench or Table? |
 |
| Side View showing Wooden Nut |
 |
| Rustic Oak Table |
 |
| End View showing Joints |
It is basically three pieces of Oak that I bought from B&Q, roughly shaped then joined together with a few simple mortise joints, with additional support provided by a cross-beam made from an old piece of banister. I fashioned a couple of wooden nuts to go on the ends of the cross-beam to make it look a bit fancy and then applied the "rustic" look by attacking it with an angle-grinder? A drop of natural finishing oil and some beeswax and hey presto! a table strong enough to be a bench.
2. Ash Plant Stand Table
My second table was a bit more delicate, made from a piece of Ash I bought and some old legs I had from a rustic stool (also in Ash). I turned the legs down in a lathe to make them a bit fancier and attached them to the top using split, circular joints with a hardwood wedge.
 |
| Plant Stand with Fancy Legs |
 |
| Small Ash Table/Stand |
The hardest bit was trying to get the four legs to look the same, but it was good fun on the lathe. I also enjoyed using a router to give a sculptured edge to the table top.
3. Spitfire Wing Coffee Table in Elm
While browsing in the timber yard at Scottish Woods (near Oakley) I came across a plank of Elm which I thought looked a bit like a Spitfire aeroplane wing.
I bought this plank and started to form the shape I saw in it, which left me enough wood to also make the sides and a shelf (it was quite a long plank!).
This was definitely a return to my 'rustic' period and not at all like the delicate plant stand I made of Ash, but I reckon it turned out pretty good:
 |
| Spitfire Wing or Surf Board? |
 |
| Spitfire Wing Coffee Table |
 |
| Front View Showing Construction |
 |
| Lovely Grain and Colours |
I retained the 'waney' or natural edge to the table top, cleaning off any loose bark using my trusty angle-grinder, making a few extra 'waney edges' where required. I really love the gold, brown and green colours that occur naturally in Elm and simply highlighted them using a natural oil and beeswax finish.
This now has pride of place as our coffee table in our living room (I had planned to sell it but Moira wouldn't let me)
4. Boat Shaped Table in Elm
My sister liked the Spitfire Wing Table so much she asked me to make an occasional table for her which would sit between two chairs. She gave me rough dimensions and I headed back to Scottish Woods to see what off-cuts they had in their timber yard shop.
I found a chunky piece of Elm which I thought looked a bit like a racing yacht, so I bought it along with a couple of pieces of Elm to make a base. I thought this would be ideal as my brother-in-law has a naval background (more frigates and destroyers than racing yachts though!).
I trimmed up the boat shaped wood and made a base that looked a bit like a boat stand, I even made a keel for the boat.
 |
| Boat-shaped Occasional Table |
 |
| Side View showing Stand and Keel |
 |
| Stern View |
 |
| Bow View |
My sister and brother-in-law seemed to like it, and even offered to pay for the wood, my labour and creativity came free (which was a fair price!).
I was starting to think that Elm was my favourite wood to work with.
5. Pine Workbench
This was a 'no-frills' practical table to use as a workbench at home and all the wood was sourced from B&Q. I got the vice and fixing bolts online from Amazon, so overall it wasn't very expensive.
Basically it started by measuring the space in front of my shed (where it would sit) and sketching what I thought it should look like, then making a simple drawing of the workbench:
 |
| Drawing of Workbench Construction |
This allowed me to work out sizes of the main items of wood that I had to purchase. I then did some more detailed drawings of how the vice would be held in position and the main timber joints, which meant I could order up the fixtures and fixings I required:
 |
| Vice Fixings |
 |
| Main Joints |
Then it was only a matter of getting the materials, cutting and drilling the wood and throwing all together.............. Simples!
 |
| Pine Workbench |
 |
| Workbench Top |
 |
| Shelf Added |
 |
| Finished Workbench |
Finally it was only a matter of moving the blue cupboard shown in the photos and sliding the workbench in to position.
The workbench has been well used since I made it last year and it has allowed me to do more elements of my woodwork projects from home.
6. Hairpin Leg Table (Elm)
I offered to make a table for my son and daughter-in-law to hold their fish tank when they moved in to their new house......... which was only fair as I had left behind their original fish tank base in London when they moved house.
I reverted back to my old favourite of Elm for the top, but instead of making the legs I ordered up some hairpin legs from Amazon. Once again it started with a basic sketch/drawing of what I thought it should look like:
 |
| Drawing of Hairpin Leg Fish Tank Table |
It had to be big enough and strong enough to support a 40 litre fish tank (which weighs approx 50kg when full of water) but high enough to keep the top away from the prying hands of a 2 year old. It also had to have a shelve to hold all the electrics associated with a fish tank.
The finish product looked like this:
 |
| Hairpin Leg Fish Tank Table |
 |
| Fish Tank Table |
 |
| Elm is such a lovely wood |
Once completed I tested it by sitting on it with my massive 65kg weight and it didn't fall apart. That was a testing factor of safety of 1.3 which I thought was perfectly adequate.
I forgot to get a photo of the finished table with the fish tank on it; but I can assure you that it was well received and still does the job it was designed for.
7. River Table
Never knew what a river table was until the teacher at my woodwork class mentioned that he would like to make one someday. Had a look at them on-line and thought.......... "that's quite simple, two pieces of waney-edge wood with some epoxy resin in the middle" ..........how difficult could it be?
As it happened it turned out to be the most complex table I had made so far.
I started by getting a piece of waney-edge wood (Elm of course) that I could cut in half and I ordered up some epoxy resin compounds (which were way more expensive than the wood!). I watched a few videos on you-tube on how to make a river table, which started with the construction of a mould (which had to be water-tight):
 |
| River Table Mould |
The two halves of Elm were clamped into position in the mould, then I had to mix up the epoxy resin, which was tinted blue using colour pigments. The epoxy resin hardener was added to the first batch and then poured in to the mould (if the resin is too deep it overheats and doesn't cure right, so you need to have several pours)
 |
| River Table after First Pour |
After about 12 hours you reach "stage B" were the resin if firm but tacky and you mix up some more and do a second pour:
 |
| River Table after Second Pour |
Luckily I only needed two pours, so after 48 hours of curing it could be removed from the mould:
 |
| River Table Removed from Mould |
Now the hard work begins!
After hours and hours of sanding (over a period of several days) and the table top was almost finished:
 |
| River Table Top almost finished |
Next I had to make some legs for the table, designing them so they didn't interfere with the transparent part of the table (i.e. the river):
 |
| River Table Legs |
 |
| Legs designed to match River Table |
Finally the legs were attached using wooden dowels and glued in to position.
I then had to finish the table top using very, very fine sandpaper (2,000 grit!), followed by an application of yacht polish and buff up using a car polisher.
I think it came up rather well:
 |
| River Table Finished |
 |
| Finished River Table |
 |
| River Table Close-up |
I was quite pleased with this one, it now has pride of place in our conservatory.
Table 8: Spalted Beech TV Table
My next door neighbour asked if I would make a small table for her to hold a small flat-screen TV so she could watch it in the bedroom. She offered to pay for it but since she had just given me her old lawnmower (which wasn't that old and much better than the one I had) I agreed to do it for nothing.
I visited my usual timber yard and found a lovely piece of Spalted Beech which I thought would make a great table top. I also bought some Ash to make the legs.
This was a relatively easy build and I thought I would make it a bit less chunky that some of my other tables by tapering the legs and curving the top.
The final product looked like this:
 |
| Table for Small TV |
 |
| Spalted Beech Table with Ash Legs |
The Spalted Beech has a great Pattern and colour, which is attributed to a fungus living inside the tree as it is growing. It doesn't harm the tree and the wood is just as usable as normal Beech:
 |
| Spalted Beech Pattern and Colour |
 |
| Spalted Beech Pattern and Colour |
A quick application of beeswax, a buff up and the TV table was ready to go:
 |
| TV Table Finished |
 |
| Spalted Beech and Ash TV Table |
Needless to say my neighbour was quite pleased with her new table.
Table 9: Graeme's Desk
I had a piece of Spalted Beech left over from the small TV table I made for my neighbour so I thought that I would a little desk/table for my grandson to use.
It had to be small enough for him to use with his little chair, but rugged enough to take the treatment dished out by a two year old.
Here's what I came up with:
 |
| Spalted Beech Desk |
And just to prove it fitted his little chair:
 |
| Graeme's Desk and Chair |
 |
| Spalted Beech Desktop on Oak Legs |
Once again I was pleased how the Spalted Beech top polished up.
Table 10: Elm TV Unit
Arguably this was a bit more than a table as it has shelves and a drawer, but some tables have drawers and some have shelves, so I think it qualifies.
This was designed to replace an existing TV unit (you know the kind with metal legs and glass shelves) and it was quite challenging to build.
Firstly let me show you what I started with:
 |
| Two Planks of Elm |
Yes it is two planks of Elm, and I also had a block of Ash to make the legs.
So I had to draw up a design that could hold the TV, Sky Box and DVD Player (I know very old school) and also make best use of the materials I had.
Here is my initial sketch of what I wanted:
 |
| TV Unit Sketch |
From this I was able to roughly mark out what I wanted on the wood and draw up more detailed design drawings:
 |
| TV Unit Front View |
 |
| TV Unit Plan View |
 |
| TV Unit Joint Details |
I was now a position to mark up the wood and cut to size, shape, drill, plane, make joints, etc. Most of which I done on the large saws and other equipment at my weekly woodwork class, with some little bits and pieces done at home.
The TV Unit was just starting to take shape when "lockdown" was announced and my woodwork classes were cancelled!!
This made things a bit more tricky.
I wanted to finish this project so I created my own little workshop; which was basically a combination between my shed, a bit of our garden and our conservatory. I had most of the equipment I needed, albeit smaller and less powerful than those at the woodwork class, but I did have to order up a router from Screwfix.
I fitted and glued all the bits together that I had already made and then faced the challenge of making the drawer. I had never made a drawer before, let alone one with dovetail joints, but I had a go:
 |
| TV Unit Under Construction |
 |
| Making good use of the Conservatory (sorry Moira) |
 |
| Dovetail Joint on Drawer |
The proof of the pudding was that the drawer didn't fall apart and it fitted in the hole I made:
 |
| Drawer in Position |
Once I had made the drawer and fitted in place the next task was to complete the table top and fit it to the unit. Luckily I had cut the top to size at the woodwork class before I finished up, it was just a matter of sanding it down and finishing it off. I wanted to give the top a profiled edge, hence the reason for purchasing a router; so I chose a profile cutter and after a few test pieces I worked on the table top:
 |
| TV Unit with top fitted |
 |
| Profiling of edge on table top |
I was surprised how well that went, it was good little router I had bought and it was relatively easy to use. All that remained now was to finish sanding the unit down, then treat it with some natural finishing oil and beeswax to bring out the colour and grain of the Elm:
 |
| TV Unit Finished |
 |
| Even the drawer looks good |
All that remained was to changeover the glass and metal TV unit for a shiny new Elm and Ash Unit:
 |
| TV Unit in Position |
Very pleased with the final result, although it took a good few weeks getting there.
So that is my Ten Times Table.................. but I haven't just produced tables in the last 18 months................ I also tried my hand at a few other woodwork activities.
I did some turning on the lathe:
 |
| Small Birch Bowl |
 |
| Birch Cake Stand |
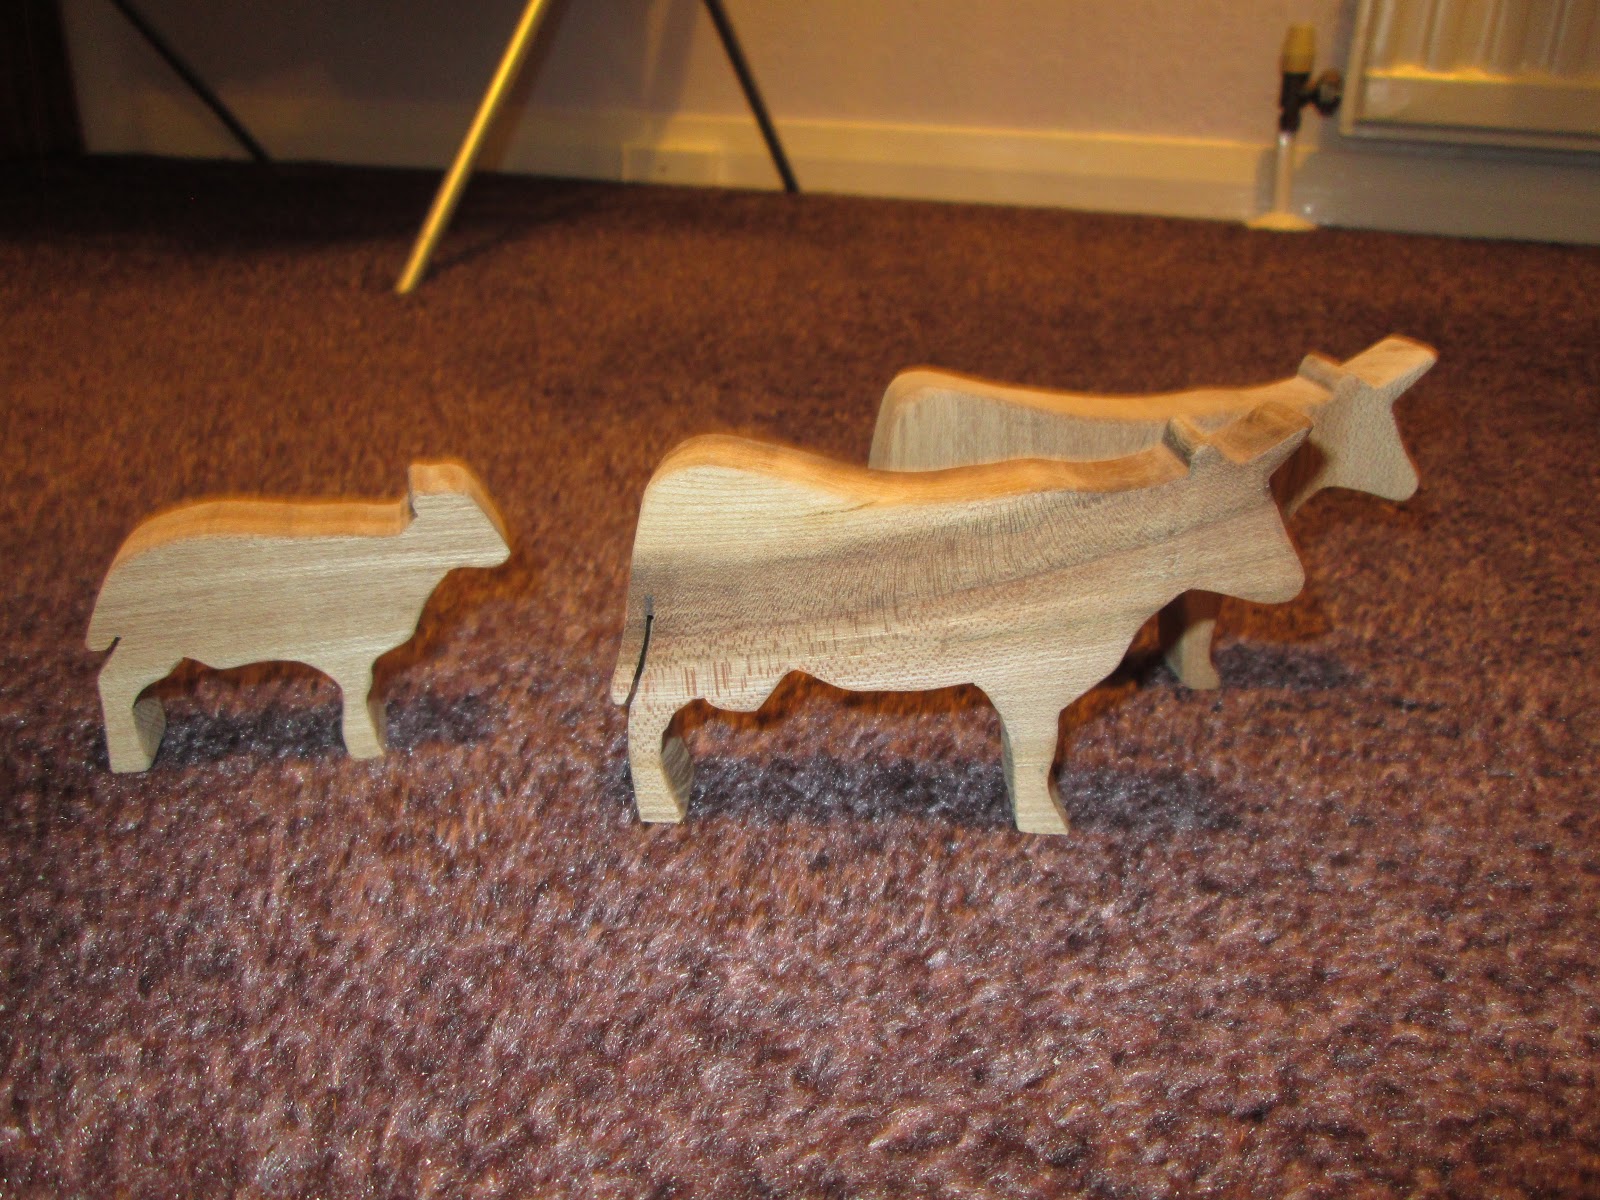
I also made some wooden animals:
 |
| Wooden Giraffe (you're having a laugh!) |
 |
| Nativity Animals (for wooden people to sit on) |
 |
| More Nativity Animals |
 |
| Woodland Creatures |
The Nativity Animals were for my son, daughter-in-law and grandson to create a nativity scene. Once my daughter-in-law had painted them (and the wooden people) they looked spectacular, must ask her to send me a photo of them.
Oh! and I also made a wooden Vannie for my grandson to play with:
 |
| Vannie at the paintshop |
 |
| Wooden Vannie |
 |
| Some chimp in a convertible almost ran into me! |
That's all Folks!
Hope I didn't bore you too much
I promise a return to views, wildlife and a bit of history soon (hopefully)
Cheers
Teddyedward


No comments:
Post a Comment